
Introduction to Mary Ada’s Smith Island Cake
A delicious journey into homemade desserts
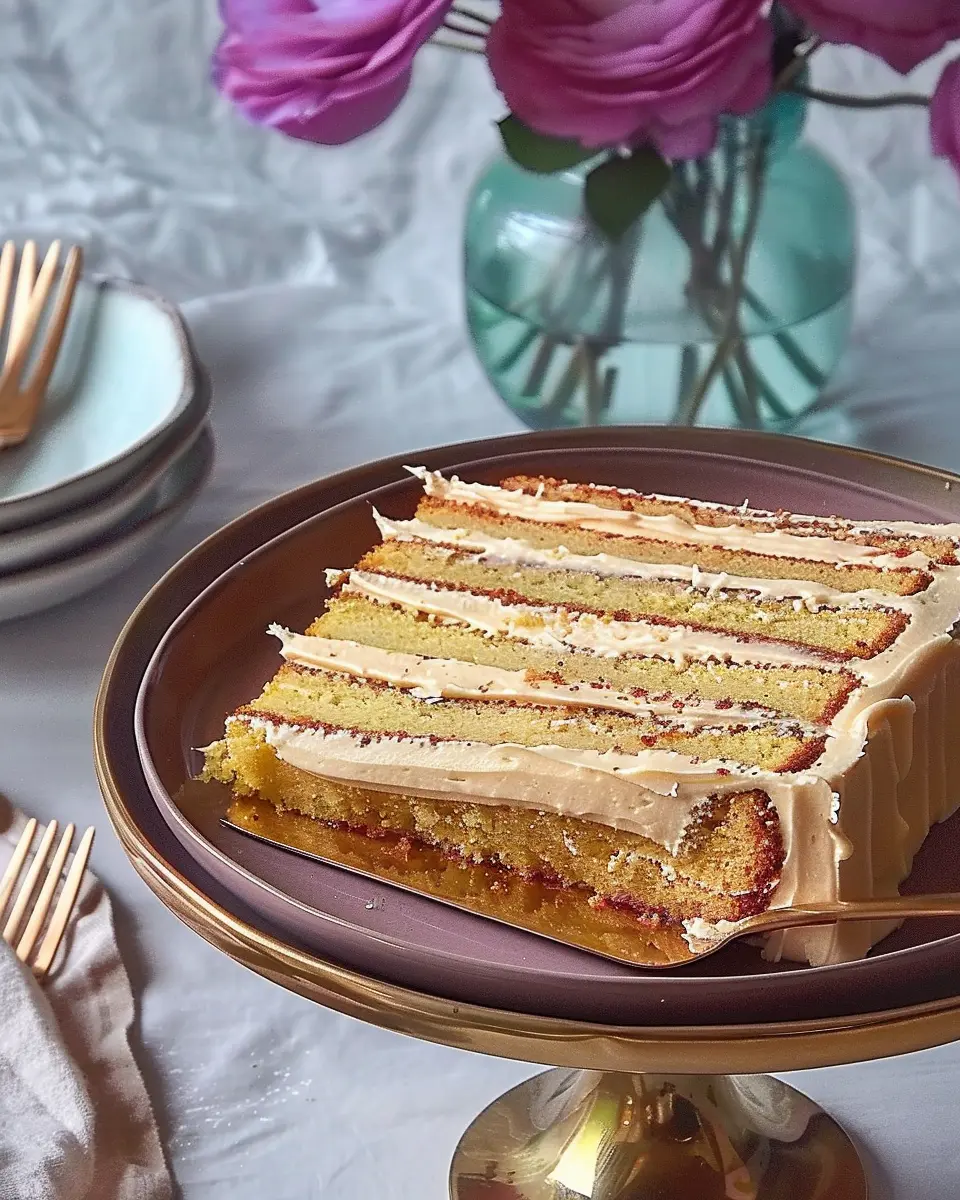
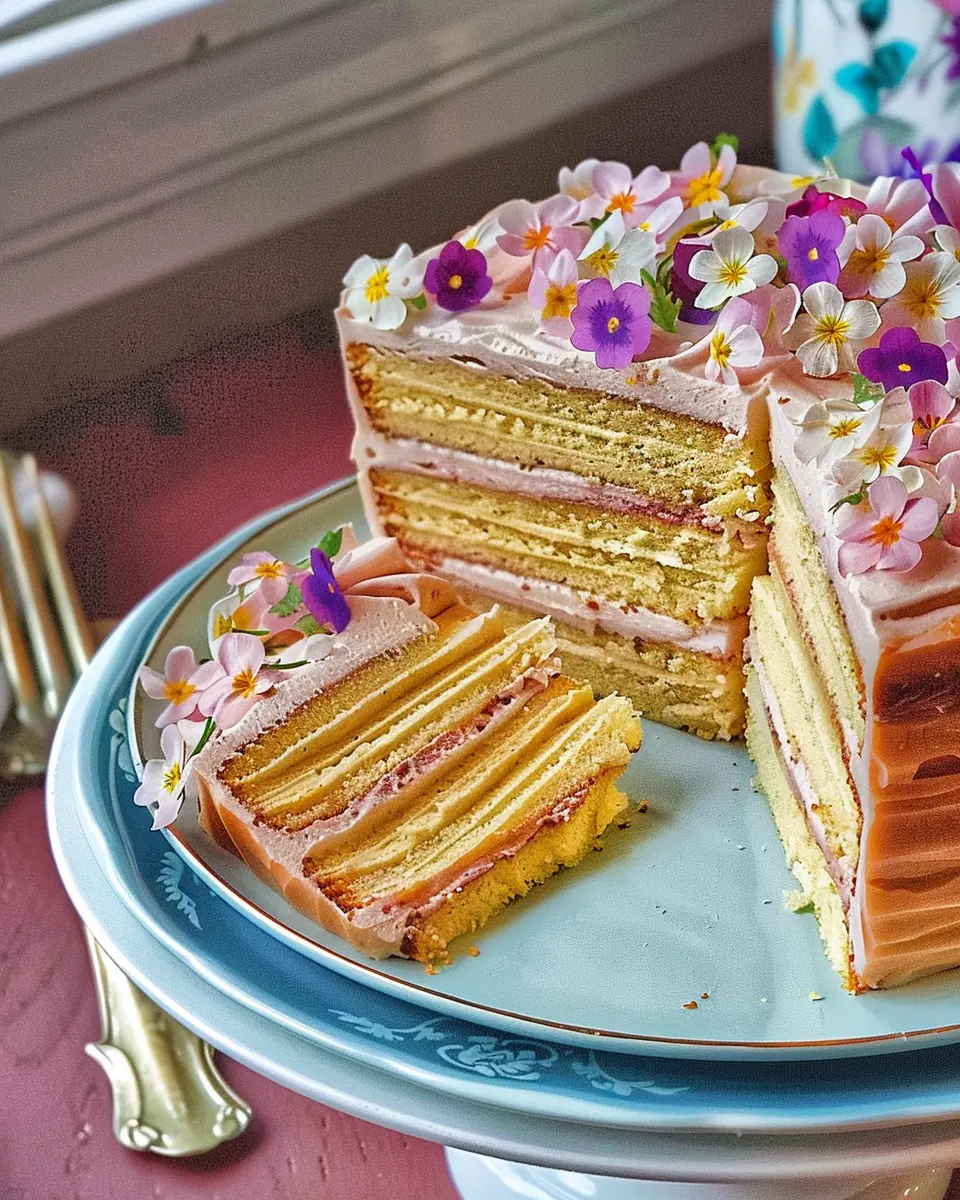
If you’re on the lookout for a showstopper dessert that dazzles not just the taste buds but also the eyes, look no further than Mary Ada’s Smith Island Cake. Originating from the serene Smith Island in Maryland, this delightful treat is a multi-layered cake that symbolizes the rich culinary heritage of the Chesapeake Bay region. Picture this: delicate layers of moist cake, each separated by a luscious frosting, creating a harmony of flavors in every bite. The journey to perfecting this cake is as rewarding as it is delicious, allowing you to channel your inner baker while honoring a time-honored tradition.
Making Mary Ada’s Smith Island Cake from scratch might seem daunting at first, but don’t let that intimidate you. As you gather your ingredients and mix your batter, you’ll find that the process is filled with moments of joy—like watching the cake layers rise beautifully in the oven. Each step serves as a reminder that homemade desserts often carry stories, whether it’s family traditions or personal milestones.
Why Smith Island Cake is worth the effort
You may wonder, “Is it really worth the time and effort to make a cake with so many layers?” Absolutely! The flavors are not just good; they are extraordinary. A three-layer cake might satisfy your sweet tooth, but a classic Smith Island Cake boasts five or more layers, allowing for an indulgent experience that is truly unparalleled.
Moreover, the layering aspect allows for creative expression—feel free to experiment with different flavor combinations, like lemon or chocolate, to suit your palate. Each layer is an opportunity to showcase your personal taste, making it a perfect centerpiece for gatherings.
Furthermore, according to a National Geographic article on culinary traditions, cakes that involve more intricate preparation often evoke a sense of pride and accomplishment. When you serve Mary Ada’s Smith Island Cake at your next gathering, not only will you wow your guests, but you’ll also create lasting memories topped with whipped cream and berries.
So, roll up your sleeves and embark on this delectable journey. You won’t regret it!
Ingredients for Mary Ada’s Smith Island Cake
Essential ingredients for the cake
Crafting the perfect Mary Ada’s Smith Island Cake starts with the right foundational elements. Here’s what you’ll need:
- 2 cups all-purpose flour
- 2 cups granulated sugar
- 1 cup buttermilk
- 1 cup unsalted butter, softened
- 4 large eggs
- 1 tablespoon baking powder
- 1 teaspoon vanilla extract
- A pinch of salt
These ingredients come together beautifully to create a moist, multi-layered cake that embodies the rich culinary tradition of Smith Island, Maryland. Each fluffy layer is a delight, easy to make, and perfect for any occasion.
Necessary items for the frosting
Don’t forget the frosting! It’s the crowning glory of your Mary Ada’s Smith Island Cake. You’ll want:
- 2 cups powdered sugar
- 1 cup unsalted butter, softened
- 1 teaspoon vanilla extract
- 2 tablespoons milk
This rich, creamy frosting is what gives the cake its luscious finish. Together, they create a dessert that’s not just a treat for the taste buds, but also a feast for the eyes.
For more tips on baking and frosting techniques, consider checking out resources from The Kitchn or Food Network. These can provide you with valuable insights as you embark on your cake-making journey!
Step-by-step Preparation of Mary Ada’s Smith Island Cake
Making Mary Ada’s Smith Island Cake is an exciting journey filled with flavors, colors, and textures that embody a taste of home. This delicious dessert has a rich history in Maryland, known for its layered cakes topped with a luscious frosting. Let’s dive into how to prepare this delightful treat step by step.
Gather and prepare your ingredients
Before diving into the baking process, it’s essential to have all your ingredients prepped and ready. Here’s what you’ll need:
-
Cake Layers:
-
2 cups of all-purpose flour
-
2 cups of granulated sugar
-
1 cup of unsalted butter (room temperature)
-
1 cup of milk
-
4 large eggs
-
2 teaspoons of baking powder
-
1 teaspoon of vanilla extract
-
A pinch of salt
-
Frosting:
-
1 cup of unsalted butter (softened)
-
4 cups of powdered sugar
-
1/2 cup of milk
-
2 teaspoons of vanilla extract
Make sure your butter is at room temperature for the best consistency. As an extra tip, preheating your oven to 350°F (175°C) is a good idea before preparing the batter, so the oven is just the right temperature when you’re ready.
Mix the cake batter
Now, let’s get down to mixing!
-
In a large mixing bowl, start by creaming together the softened butter and granulated sugar using an electric mixer on medium speed. This should take about 5 minutes until it’s light and fluffy.
-
Add in your eggs one at a time, ensuring each is well incorporated before the next goes in. Don’t forget the vanilla extract!
-
In another bowl, whisk together your flour, baking powder, and salt.
-
Gradually add the dry ingredients to the butter and sugar mixture, alternating with the milk. Begin and end with the flour mixture to keep the batter fluffy. Mix until just combined.
Now that your batter is ready, you’re one step closer to that gorgeous Smith Island Cake!
Bake the layers to perfection
Next, it’s time to bake!
-
Grease your cake pans with a bit of butter and dust them with flour. This step is crucial to ensure the layers come out easily.
-
Divide the batter evenly among the prepared cake pans. You can use a kitchen scale to be precise if you have one handy.
-
Bake in the preheated oven for about 25-30 minutes or until a toothpick inserted into the center comes out clean.
Let the layers cool in the pans for about 10-15 minutes before transferring them to a wire rack. This will help avoid soggy bottoms.
Prepare the frosting
While the layers are cooling, let’s whip up that smooth frosting that will bring the Smith Island Cake to life!
-
In a large mixing bowl, beat the softened butter until creamy.
-
Gradually add the powdered sugar, alternating with the milk until you achieve a smooth and spreadable consistency.
-
Stir in the vanilla extract for added flavor. Taste it; if you want a richer frosting, feel free to add a little more powdered sugar!
Assemble your Smith Island Cake
Now, onto the most exciting part: assembling your masterpiece!
-
Carefully place the first cake layer on a serving plate. Spread a generous amount of frosting on top. Place the second layer on top and repeat this process until all layers are stacked.
-
Once all layers are assembled, use the remaining frosting to coat the top and sides of the cake.
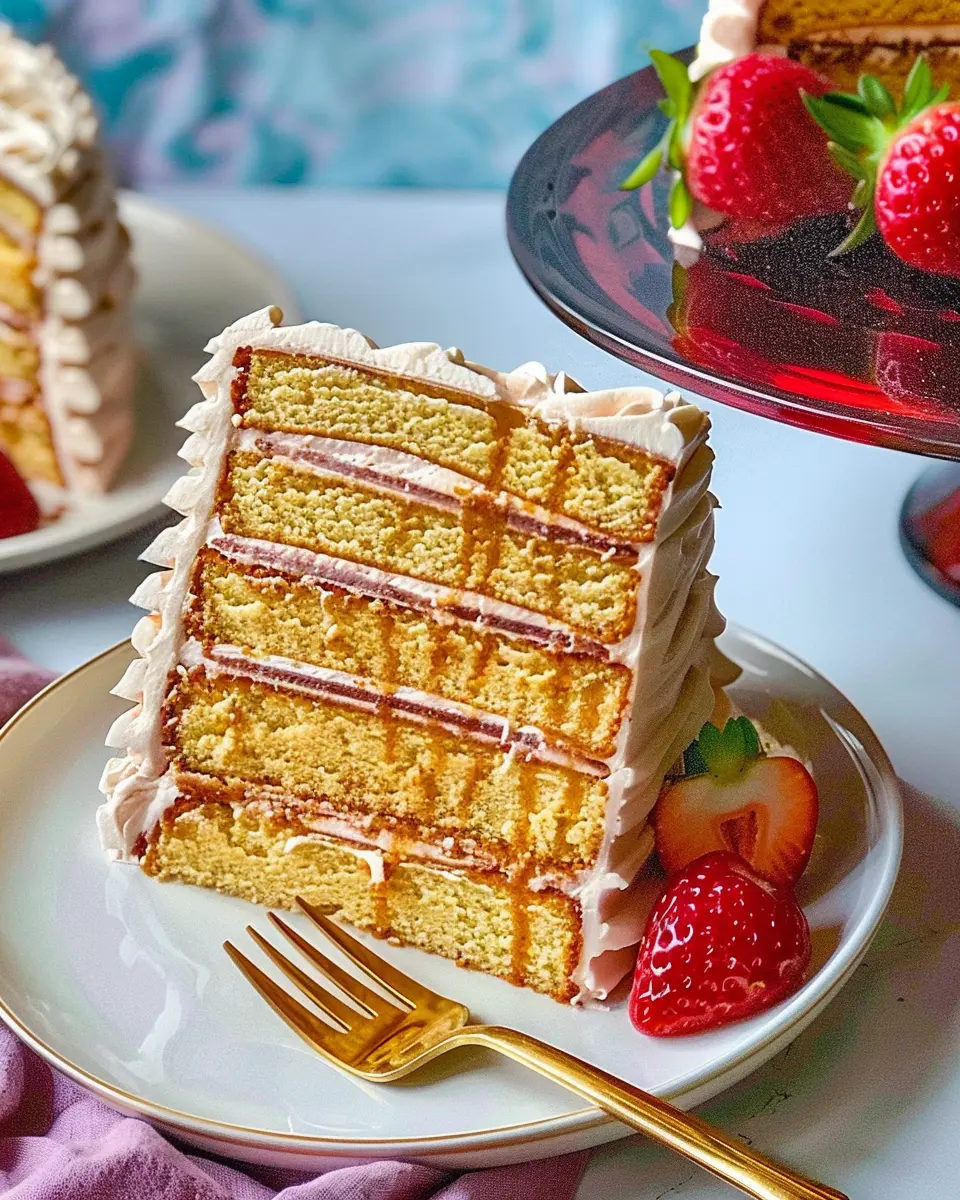
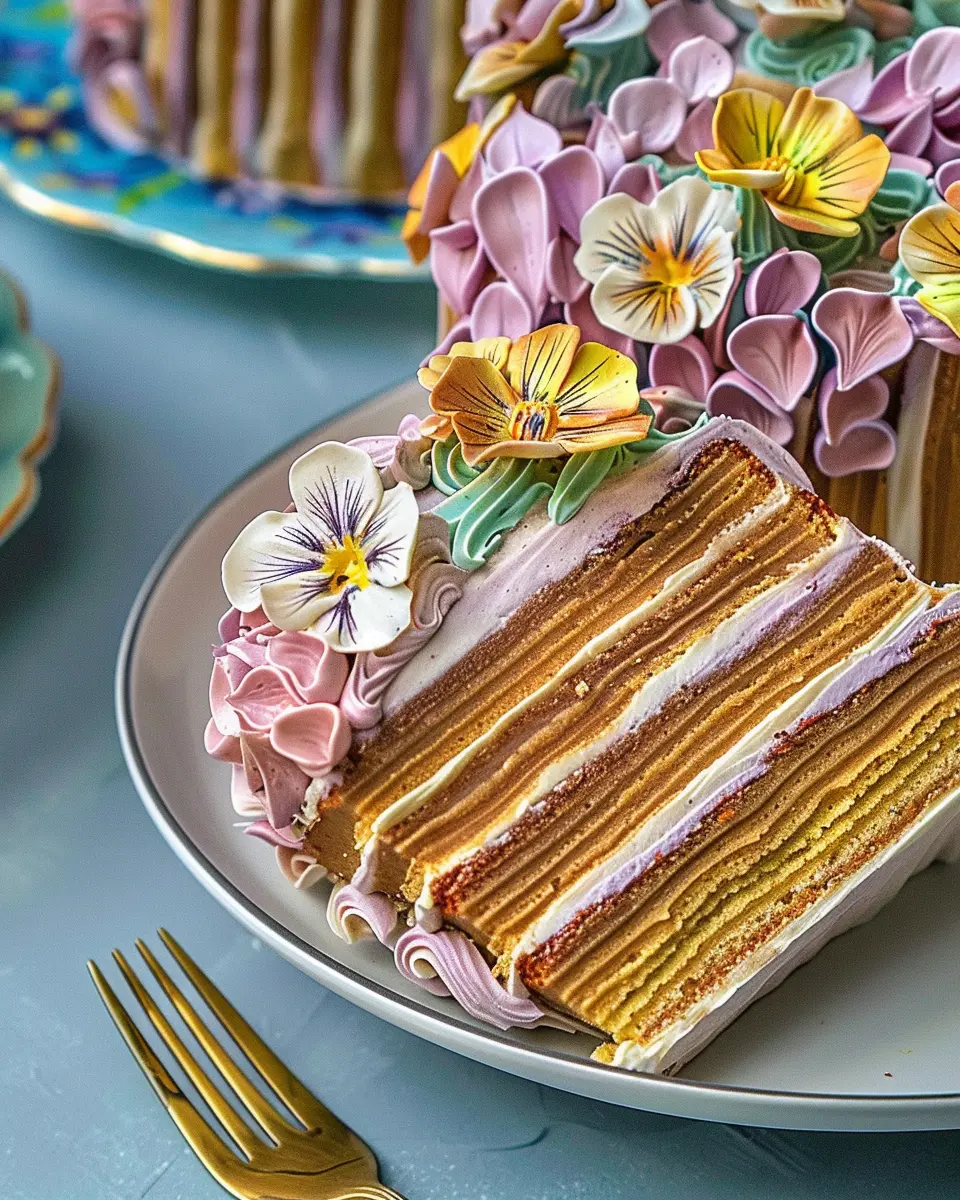
For a beautiful finish, consider garnishing with seasonal fruits or even chocolate shavings. Serve and enjoy this delightful Mary Ada’s Smith Island Cake with friends and family!
Baking this cake not only creates a stunning centerpiece for your dessert table but also a wonderful opportunity to connect with your loved ones over something sweet. Dive into this culinary experience, and share your version of Smith Island Cake with us online!
Variations of Mary Ada’s Smith Island Cake
When it comes to Mary Ada’s Smith Island Cake, the versatility of this delightful dessert means there’s always room for creativity. Let’s dive into a couple of variations that might just become your new favorites!
Chocolate-flavored Smith Island Cake
If you have a sweet spot for chocolate, you’ll love this decadent twist on the classic Smith Island Cake. By adding rich cocoa powder to your cake layers and a luscious chocolate ganache between them, you can create a heavenly creation that’s sure to impress any chocolate lover.
Consider these tips for the chocolate variation:
- Cocoa Powder: Use high-quality cocoa powder for a deep, robust flavor.
- Chocolate Ganache: Make your ganache with heavy cream and dark chocolate. This will add an elegant touch to each layer.
If you’re looking for more inspiration, check out this chocolate cake guide to enhance your baking skills!
Seasonal fruit-infused layers
One of the best parts about Mary Ada’s Smith Island Cake is that you can easily incorporate seasonal fruits into your layers. Jam-packed with fresh fruit flavors, this version celebrates the freshness of each season.
Here’s how to get started:
- Fruits: Use strawberries in spring, peaches in summer, apples in fall, and citrus in winter. Pureeing the fruit and stirring it into the frosting provides a burst of flavor!
- Color: Layering bright fruits gives a beautiful, vibrant appearance, making it perfect for gatherings or celebrations.
Make sure to experiment a little. You could be creating the next beloved variation of Mary Ada’s Smith Island Cake! Dive into the world of flavors, and who knows—your new favorite cake might be just a recipe away!
Cooking Tips and Notes for Mary Ada’s Smith Island Cake
How to Ensure Even Layers
Achieving perfectly even layers is crucial for the iconic Mary Ada’s Smith Island Cake. Begin by using cake pans that are the same size and shape. Grease and flour them thoroughly to prevent sticking. To ensure uniform thickness, consider using a kitchen scale to measure your batter precisely. Divide your total batter by the number of layers you’re creating, then pour the same amount into each pan. And don’t forget to tap the pans gently on the countertop to remove air bubbles before baking!
Tips for the Perfect Frosting Consistency
A luscious frosting can elevate your Smith Island Cake to new heights! For an ideal consistency, start with room-temperature butter and sift your powdered sugar; this prevents lumps. Add a splash of milk a tablespoon at a time until your frosting is spreadable but not too runny. If you’re in doubt, test a small amount on the cake—spreadability matters!
For more baking tips, check out resources like Serious Eats or America’s Test Kitchen for expert advice!
Serving Suggestions for Mary Ada’s Smith Island Cake
Best accompaniments for your cake
When it comes to serving Mary Ada’s Smith Island Cake, the right accompaniments can elevate your dessert experience. Pair your cake with a generous scoop of fresh whipped cream or a dollop of tangy lemon curd. For those inspired to go gourmet, consider serving it alongside homemade mint-infused ice cream. This refreshing addition balances the sweet, rich layers of the cake beautifully and promises to impress your guests.
Creative serving ideas to impress
Presentation makes a difference! To wow your guests, try stacking individual slices on rustic wooden boards layered with fresh fruit like berries or citrus slices. Drizzle with a light syrup made from honey and vanilla for an elegant touch. You can also create a beautiful cake display by adorning a stand with edible flowers, a delightful nod to seasonal elegance.
For additional inspiration, check out sources like Food52 to explore innovative dessert serving ideas that complement your Smith Island Cake. Remember, the key is to keep it simple yet striking, encouraging everyone to indulge in this Southern classic!
Time Breakdown for Mary Ada’s Smith Island Cake
When you’re ready to dive into the delightful process of creating Mary Ada’s Smith Island Cake, it’s essential to manage your time effectively. Here’s a quick overview to help you organize your baking adventure!
Preparation Time
Getting started with your cake doesn’t take long at all! Expect to spend about 30 minutes gathering your ingredients and prepping your baking pans. This is the perfect time to set the mood—maybe play your favorite playlist or podcast as you work.
Baking Time
The baking process is where the magic happens. Each layer of this scrumptious cake will need about 25 minutes in the oven. If you’re making multiple layers, remember to allow a little extra time for the oven to reheat!
Assembly and Chilling Time
Once you’ve baked those beautiful layers, it’s time for assembly! This step will take around 45 minutes as you layer and frost the cake carefully. After it’s all put together, let it chill in the fridge for at least two hours. This chilling period helps the flavors meld together, making every bite even more delicious.
Now that you know how to plan your time, you’re one step closer to enjoying your very own slice of Mary Ada’s Smith Island Cake. For tips on baking soda versus baking powder or other cake insights, you can check out Serious Eats on baking fundamentals. Happy baking!
Nutritional Facts for Mary Ada’s Smith Island Cake
Calories per serving
When indulging in Mary Ada’s Smith Island Cake, it’s essential to know what you’re putting on your plate. Each slice packs approximately 350 calories, making it a decadent treat that’s best enjoyed in moderation. Despite the calories, the joy it brings often outweighs the numbers!
Breakdown of key nutrients
Looking deeper into the nutritional profile of Mary Ada’s Smith Island Cake, you’ll find a variety of essential nutrients that can contribute to your overall health in small amounts:
- Total Fat: 18 grams (including healthy fats)
- Carbohydrates: 45 grams (providing that delightful sweetness)
- Protein: 3 grams (a little boost for your muscles)
- Sugar: 30 grams (because, let’s face it, we love our desserts sweet!)
This cake is rich in flavor and has some nutritional benefits, especially when shared with loved ones. If you’re curious about mindful eating strategies, you might enjoy exploring articles on sites like Healthline or EatRight for balanced ideas.
By understanding the nutritional facts of Mary Ada’s Smith Island Cake, you can enjoy this beloved dessert while maintaining a balanced diet. So go ahead, treat yourself—just keep those portion sizes in mind!
FAQs about Mary Ada’s Smith Island Cake
Can I make this cake in advance?
Absolutely! In fact, preparing Mary Ada’s Smith Island Cake ahead of time can enhance its flavors. You can bake the layers a day or two in advance and let them cool completely before assembling. Just be sure to wrap each layer tightly in plastic wrap to keep them moist. When you’re ready to serve, add the frosting and enjoy!
What’s the best way to store leftovers?
If you find yourself with leftover Smith Island Cake (though that’s a feat on its own!), wrap it up well in plastic wrap or store it in an airtight container. It keeps best in the refrigerator for about five days. However, if you want to keep it fresh even longer, consider freezing portions. Just slice it up, wrap each slice individually, and place them in a freezer-safe container. When you’re in the mood for a sweet treat, just thaw a slice in the fridge overnight.
Is it possible to make a gluten-free version?
Definitely! To whip up a gluten-free Mary Ada’s Smith Island Cake, substitute all-purpose flour with a good gluten-free flour blend. Many blends work well for baking, but be sure to check that it includes xanthan gum for better structure. Additionally, using a recipe like this one offers versatility for various diets. Want to know more? Check out the Gluten Intolerance Group for tips on gluten-free baking!
By addressing these questions, we hope to inspire you to not only bake this wonderful cake but also tailor it to your preferences. Happy baking!
Conclusion on Mary Ada’s Smith Island Cake
The joy of homemade desserts and creating memories
There’s something incredibly special about baking Mary Ada’s Smith Island Cake. It’s not just a treat; it’s a way to connect with friends and family over a shared love for deliciousness. Each layer tells a story, and as you gather around the table, the warm aroma fills the air, sparking soul-nourishing conversations.
Homemade desserts like this cake often become family traditions, a symbol of love and celebration. So, why not schedule a baking day with your loved ones? You’ll not only indulge in a tasty dessert but also create lasting memories. Dive into this delicious adventure, and enjoy every slice!
For even more inspiration on homemade desserts, check out the American Cake Society for a treasure trove of sweet ideas and baking tips.
PrintMary Ada’s Smith Island Cake: The Best Indulgent Dessert Recipe

Experience the rich layers of Mary Ada’s Smith Island Cake, a delicious dessert that brings together the finest ingredients for an indulgent treat.
- Prep Time: 30 minutes
- Cook Time: 30 minutes
- Total Time: 1 hour
- Yield: 1 cake
- Category: Dessert
- Method: Baking
- Cuisine: American
- Diet: Nut-free
Ingredients
- 1 cup unsalted butter, softened
- 3 cups granulated sugar
- 6 large eggs
- 3 cups all-purpose flour
- 1 cup whole milk
- 1 tablespoon vanilla extract
- 1/2 teaspoon baking powder
- 1/2 teaspoon salt
Instructions
- Preheat oven to 350°F (175°C).
- In a large bowl, cream together the butter and sugar until light and fluffy.
- Add the eggs one at a time, beating well after each addition.
- In another bowl, combine the flour, baking powder, and salt.
- Gradually add the flour mixture to the creamed mixture, alternating with the milk. Mix in the vanilla.
- Pour the batter into greased cake pans and bake for 25-30 minutes.
- Allow to cool before assembling with frosting.
Notes
- For best results, let the cake layers cool completely before frosting.
- Ensure all ingredients are at room temperature for a smoother batter.
Nutrition
- Serving Size: 1 slice
- Calories: 450
- Sugar: 25g
- Sodium: 200mg
- Fat: 22g
- Saturated Fat: 14g
- Unsaturated Fat: 6g
- Trans Fat: 0g
- Carbohydrates: 55g
- Fiber: 1g
- Protein: 5g
- Cholesterol: 90mg


")