
Introduction to Espresso Cheesecake
Why Espresso Cheesecake is the Perfect Dessert for Young Professionals
As a young professional, life can often feel like a whirlwind of meetings, deadlines, and social commitments. Amidst all this hustle, finding the time to indulge in a rich and decadent dessert can be a thrilling way to unwind. Enter espresso cheesecake—a delightful fusion of creamy cheesecake and robust espresso that’s as sophisticated as it is scrumptious.
Imagine finishing a long day at work, then treating yourself to a slice of this luxurious dessert. It’s not just a treat; it’s an experience! The coffee notes mingle beautifully with the cheesecake’s rich creaminess, making it the perfect end to a busy evening. Plus, when whipped up with love at home, it’s a fantastic way to impress friends during casual gatherings or simply to enjoy yourself after a long week. You can find some helpful tips on hosting gatherings and impressing your friends on The Spruce Eats.
But why specifically espresso cheesecake? For starters, it’s incredibly easy to make. This isn’t just a dessert for seasoned bakers. Even if you’re new to the kitchen, you can create this delightful cheesecake in no time. Plus, espresso adds an extra kick that not only enhances the flavor but can also give you a little boost when you’re feeling sluggish after a long day.
The Perfect Pairing
There’s something special about pairing your cheesecake with a warm cup of coffee or even a refreshing iced beverage. Not only does this arouse your taste buds, but it also elevates your entire dessert experience. Think about those rich layers of cheesecake against the backdrop of your favorite café drink; it’s a pairing made in dessert heaven.
Whether you’ve had a stressful week or are simply looking to celebrate life’s small victories, espresso cheesecake is here to make those moments sweeter. So, grab your mixing bowl and let’s create something unforgettable together!
Ingredients for Espresso Cheesecake
Essential Ingredients for the Crust
Creating the perfect espresso cheesecake begins with a crumbly, yet flavorful crust. For that, you’ll need:
- Graham cracker crumbs (about 1.5 cups for a rich base)
- Unsalted butter (melted, roughly ½ cup—this adds moisture)
- Granulated sugar (about ¼ cup for sweetness)
This simple mix harmoniously balances the creamy filling with a crunchy contrast.
Key Ingredients for the Filling
Now, let’s get to the heart of this dessert—the luscious filling. To achieve that coffee-forward flavor, ensure you have:
- Cream cheese (2 packs, softened for easy mixing)
- Granulated sugar (approximately ¾ cup to enhance the creaminess)
- Sour cream (½ cup for a tangy depth)
- Espresso powder (2 tablespoons; the star ingredient that delivers the caffeine kick)
- Vanilla extract (1 teaspoon to round out the flavors)
- Eggs (3 large, vital for binding and richness)
Each of these ingredients plays a critical role in crafting a cheesecake that’s as luxurious as it is flavorful.
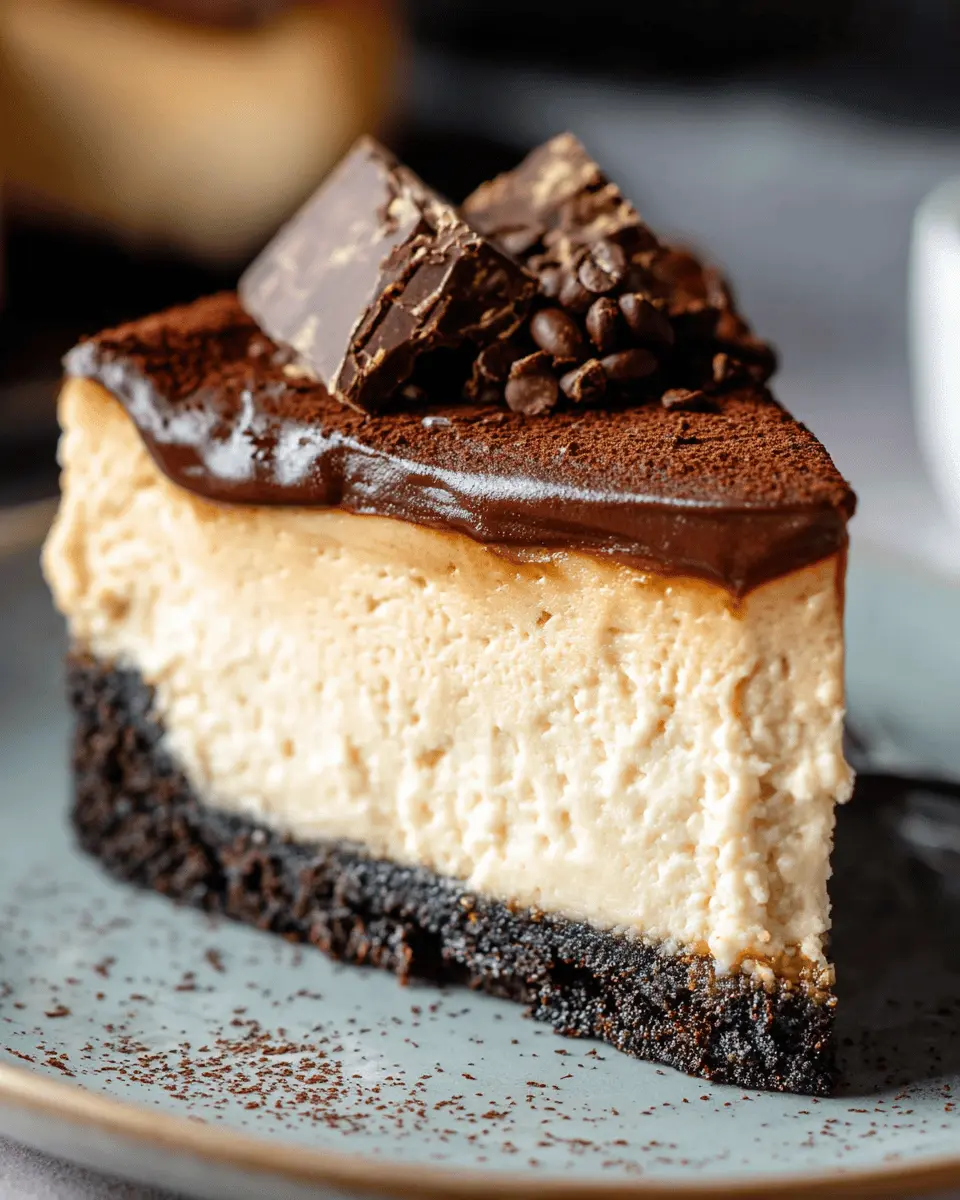
Toppings and Garnishes for Extra Indulgence
Finishing touches can elevate your espresso cheesecake from ordinary to extraordinary. Consider these delightful options:
- Whipped cream (a light, airy topping)
- Chocolate shavings (for a bit of decadence)
- Cocoa powder (a dusting for that coffeehouse vibe)
Not only do these garnishes add visual appeal, but they also provide an extra layer of texture and flavor.
For more inspiration, you might enjoy checking expert opinions on dessert presentation at sites like Food52 and Bon Appétit.
Are you ready to impress your friends and savor every bite? This espresso cheesecake will undoubtedly be your new go-to dessert!
Step-by-Step Preparation for Espresso Cheesecake
Making an espresso cheesecake is not only a delightful journey but also an opportunity to indulge in a rich and velvety dessert that’s perfect for any gathering. Let’s dive into the preparation steps together.
Get Your Ingredients Ready
Before you even think about mixing up your ingredients, take a moment to gather everything you need. Having your ingredients prepped and within arm’s reach will make the process smoother and more enjoyable. Here’s what you’ll need:
-
For the crust:
-
2 cups OREO cookie crumbs
-
½ cup melted butter
-
For the filling:
-
4 packs (8 oz) cream cheese, softened
-
1 cup granulated sugar
-
1 teaspoon vanilla extract
-
3 large eggs
-
1 cup sour cream
-
½ cup brewed espresso or strong coffee (cooled)
-
A pinch of salt
-
For the ganache:
-
1 cup semisweet chocolate chips
-
½ cup heavy cream
It’s always a good idea to measure and prepare your ingredients ahead of time; this not only keeps things organized but also gives you a sense of accomplishment from the get-go.
Prepare the Crust with OREO Cookie Crumbs
To create that irresistible foundation for your espresso cheesecake, you’ll need to make a crust from OREO cookie crumbs. Here’s how:
- Preheat your oven to 350°F (175°C).
- In a medium mixing bowl, combine the OREO cookie crumbs with melted butter. Mix until everything is well-coated and resembles wet sand.
- Press this mixture firmly into the bottom of a 9-inch springform pan. Make sure it’s evenly distributed and compact.
- Bake the crust for about 10 minutes, then set aside to cool while you prepare the filling.
The OREO crust provides a deliciously chocolatey contrast to the creamy espresso filling.
Mix the Creamy Filling
Now it’s time for the star of the show—our espresso cheesecake filling! Follow these simple steps to whip it up:
- In a large mixing bowl, beat the softened cream cheese until it’s smooth and creamy. This might take a few minutes, so be patient!
- Gradually add in the sugar and beat until well combined, scraping down the sides of the bowl as needed.
- Mix in the vanilla extract, followed by adding one egg at a time, ensuring each is fully incorporated before adding the next.
- Stir in the sour cream, brewed espresso, and a pinch of salt until the filling is smooth and luscious.
If you want expert tips on the cheese’s texture, you might check out sources like the Cheese Grotto.
Pour and Bake Your Cheesecake
Once your filling is perfectly mixed, pour it over the cooled crust in the springform pan.
- Smooth the top with a spatula, allowing it to be as level as possible.
- Bake your cheesecake in the preheated oven for about 55-65 minutes. The edges should be set, but the center will still be a bit wobbly; it will firm up as it cools.
Pro tip: Avoid over-baking your cheesecake to ensure it stays creamy and does not crack.
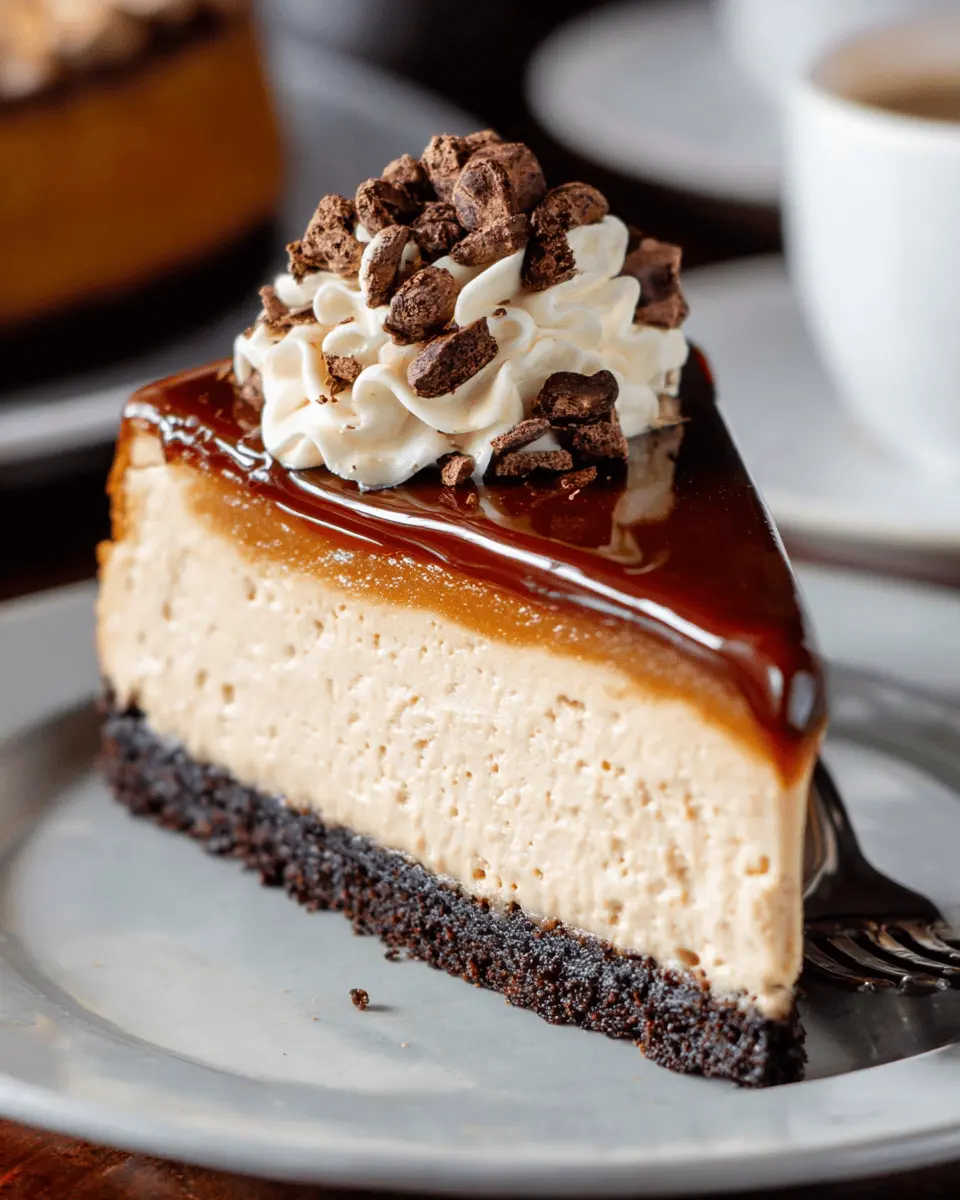
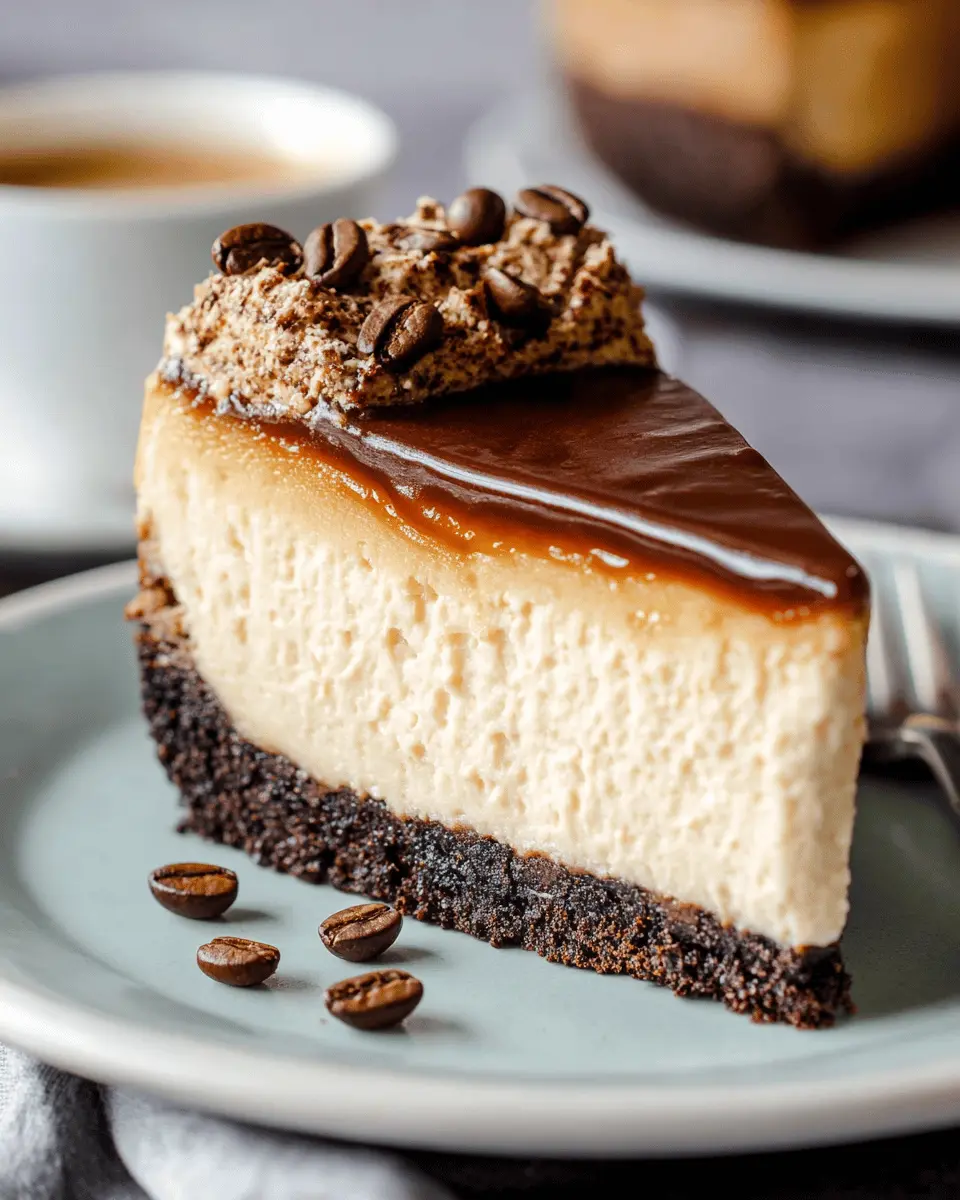
Create the Ganache Topping and Frosting
While your cheesecake is baking, you can prepare a lovely ganache topping.
- In a small saucepan, heat the heavy cream over medium heat until it begins to simmer.
- Remove from heat and add the semisweet chocolate chips. Let it sit for a few minutes to melt, then stir until smooth.
Once your cheesecake has cooled, pour the ganache over the top and spread evenly. Allow it to set while you work on chilling your cheesecake.
Chill and Perfect Your Cheesecake Before Serving
The last step before indulging in your espresso cheesecake is chilling! Once your cheesecake has cooled to room temperature, cover it with plastic wrap and refrigerate for at least 4 hours (or overnight for the best results!).
Before serving, consider garnishing it with whipped cream or chocolate shavings for a beautiful presentation.
And there you go! Your espresso cheesecake is now ready to impress family and friends. Enjoy the rich flavors and the compliments that will surely come your way! Are you ready to create this delightful dessert?
Variations on Espresso Cheesecake
Coffee-Flavored Twists
When it comes to espresso cheesecake, the world of flavor possibilities is vast. For a coffee-flavored twist, consider adding a rich layer of chocolate ganache on top. The combination of dark chocolate and espresso creates a decadent harmony that coffee lovers will adore. Alternatively, you can infuse your cheesecake batter with flavored coffee syrups, such as hazelnut or vanilla, to personalize your dessert. In fact, a recent survey showed that 66% of coffee drinkers preferred flavored options, so why not take your cheesecake into that delicious territory?
Another fun variation is to incorporate coffee-flavored liqueurs (non-alcoholic options are available too!) into your batter. Just a touch goes a long way in elevating the overall flavor profile. If you’re feeling adventurous, don’t hesitate to add espresso-soaked ladyfingers or crumbled espresso-flavored cookies for texture!
No-Bake Espresso Cheesecake Option
For those warmer months when you want to skip the oven, a no-bake espresso cheesecake is the perfect solution. Simply combine cream cheese, powdered sugar, and heavy cream, then fold in strong brewed espresso. Gelatin can help set the mixture, making it firm and sliceable without the need for baking.
Not only is this a quicker option, but it also allows the coffee essence to shine through without the added heat. You can top it off with a dusting of cocoa powder or a chocolate sauce drizzle for extra flair. This silky, coffee-infused dessert is perfect for gatherings or even a cozy night in. Interested in more no-bake recipes? Check out this guide on no-bake desserts for inspiration!
With these variations, you’ll find the right way to enjoy your perfect espresso cheesecake, tailored just for you and your loved ones.
Cooking Tips and Notes for Espresso Cheesecake
Ensuring a Smooth Filling without Lumps
To achieve that silky texture in your espresso cheesecake, start with room temperature ingredients. This means allowing your cream cheese to sit out for about an hour before mixing. When blending, use a food processor or a stand mixer on low speed to ensure everything combines evenly, reducing the risk of lumps. For added creaminess, consider sifting your dry ingredients beforehand.
Cooling Techniques to Prevent Cracking
Cooling your espresso cheesecake gradually is crucial to maintain its beautiful structure. After baking, turn off the oven and crack the door slightly to let it cool slowly within the its warm environment. This method can help prevent sudden temperature changes, thus reducing the chances of cracks forming.
Lastly, giving your cheesecake a chance to rest in the fridge for at least four hours (or overnight, if possible) will enhance its flavor and make it easier to slice. For more tips on cheesecakes, you can check out resources on baking techniques here. Happy baking!

Serving Suggestions for Espresso Cheesecake
Creative Ways to Present Your Indulgent Dessert
Presentation is key when serving your espresso cheesecake. Consider using a clear glass dish or individual ramekins to showcase those luscious layers. Garnish with a sprinkle of cocoa powder, a few coffee beans, or a drizzle of caramel sauce to heighten the visual appeal. For a touch of elegance, serve each slice on a fine china plate with a dollop of whipped cream or a scoop of vanilla ice cream on the side. You might even consider topping with grated dark chocolate for that extra touch of indulgence that coffee lovers will appreciate.
Pairing with Non-Alcoholic Beverages
Finding the right drink to complement your espresso cheesecake can elevate your dessert experience. A rich, creamy cappuccino or a frothy latte can enhance the coffee flavors in your cheesecake. Alternatively, consider a refreshing iced chai tea or a tangy lemon soda to provide a delightful contrast. For something unique, try pairing it with a sparkling water infused with fresh mint or fruit. This will cleanse your palate and enhance the complex flavors of the cheesecake.
For even more ideas on delicious pairings, check out resources from The Kitchn.
Time Breakdown for Espresso Cheesecake
Preparation Time
The first step in crafting your delightful espresso cheesecake is the preparation. You’ll want to set aside about 25 minutes for this. During this time, you’ll gather your ingredients, mix the crust, and whip up that velvety batter. Considering a messy kitchen can be a mood killer, ensure you have your workspace organized for an enjoyable cooking experience.
Cooking Time
Once your oven is preheated to perfection, it’s time to bake that cheesecake! This will take roughly 55-60 minutes. It’s crucial to keep an eye on it as it bakes so that it doesn’t overcook and lose its creamy charm. If you love a good kitchen timer, now’s the time to let it shine!
Total Time Including Chilling
Don’t forget to factor in the chilling process, which can take about 4 hours. Waiting is challenging, but this step is vital for the flavors to meld beautifully. So, plan on spending a total of approximately 5 hours and 25 minutes from start to finish, including chilling. Your patience will be rewarded with a decadent espresso cheesecake that will impress your friends and family.
Need more tips on perfecting your cheesecake technique? Check out resources like Bon Appétit for expert advice on achieving the perfect bake!
Nutritional Facts for Espresso Cheesecake
Calories per Serving
An espresso cheesecake slice typically contains around 350 calories. While it’s a delightful indulgence, keeping an eye on portion sizes can help maintain your overall dietary balance.
Key Nutritional Components
When you dive into that luscious slice of espresso cheesecake, you’re not just enjoying the rich flavors; you’re also benefiting from essential nutrients:
- Protein: Cheesecake often includes cream cheese, offering a good protein boost.
- Fat: While it has a higher fat content, particularly from cream cheese and any added creams, choosing lower-fat versions can be a healthier option.
- Calcium: The dairy ingredients contribute to calcium intake, supporting bone health.
For more on the benefits of dairy, check out resources like the National Dairy Council which provides valuable insights into nutritional benefits.
Ultimately, an espresso cheesecake can fit into a balanced diet if enjoyed in moderation. So, the next time you’re treating yourself, remember to savor it!
FAQ about Espresso Cheesecake
How can I make a lactose-free version of espresso cheesecake?
Making a lactose-free espresso cheesecake is totally doable! Swap regular cream cheese for a lactose-free alternative, which is widely available in grocery stores nowadays. For the sour cream, consider using a dairy-free yogurt, like coconut or almond-based varieties, to keep that creamy texture. Using lactose-free heavy cream will work wonders too, ensuring a rich and balanced flavor without compromising your dietary needs.
What can I substitute if I don’t have OREO cookies for the crust?
If you’re not a fan of OREO cookies or simply don’t have them on hand, don’t fret! Here are a few tasty alternatives for your espresso cheesecake crust:
- Graham crackers: These offer a classic base with a slightly different flavor.
- Digestive biscuits: They provide a nice balance of sweetness and crunch.
- Chocolate wafer cookies: For an extra chocolatey delight.
- Almond flour or crushed nuts: If you prefer a gluten-free option, combining these with melted butter makes for a fantastic crust.
Feel free to get creative; the crust is just as important as the filling!
How do I store leftover espresso cheesecake?
To keep your espresso cheesecake fresh and delectable, store it in an airtight container in the refrigerator. It can last about 5 to 7 days, which means you can enjoy those luscious leftovers! If you want to extend its shelf life, consider freezing individual slices. Just make sure they’re wrapped tightly, preferably in plastic wrap followed by aluminum foil. When you’re ready to indulge again, let the cheesecake thaw in the fridge overnight. For more tips, you might check out resources like The Kitchn for more expert storage advice.
With these FAQs answered, you’re all set to whip up your delightful espresso cheesecake with confidence!
Conclusion on Espresso Cheesecake
Recap of the Delightful Experience of Making Espresso Cheesecake
Creating espresso cheesecake is not just about baking; it’s about crafting a moment of indulgence. Each layer, infused with rich espresso flavors, invites you to savor both the process and the final product.
When you bring this cheesecake to life, you’re not just following a recipe; you’re participating in an experience that tantalizes the senses. Picture the fragrant aroma of brewing espresso mingling with buttery crust and creamy filling. Have you thought about serving it alongside a refreshing brewed coffee for balance?
This dessert is perfect for gatherings or a quiet evening at home. Whether you’re celebrating a special occasion or simply treating yourself, a slice of this cheesecake is sure to bring joy. So don’t wait—embrace the pleasure of baking and treat yourself to this luscious espresso cheesecake! For more inspiration, check out resources like The Spruce Eats for variations and tips to elevate your baking journey.
PrintEspresso Cheesecake: An Indulgent Twist on a Classic Dessert
Experience the rich and creamy delight of Espresso Cheesecake, a luxurious take on the traditional dessert that combines the bold flavor of espresso with a velvety cheesecake texture.
- Prep Time: 20 minutes
- Cook Time: 60 minutes
- Total Time: 4 hours 20 minutes
- Yield: 12 servings
- Category: Dessert
- Method: Baking
- Cuisine: American
- Diet: Vegetarian
Ingredients
- 1 ½ cups graham cracker crumbs
- ½ cup unsalted butter, melted
- 2 cups cream cheese, softened
- 1 cup granulated sugar
- 3 large eggs
- 1 tablespoon vanilla extract
- ¼ cup brewed espresso, cooled
- ½ cup sour cream
- ¼ cup heavy cream
Instructions
- Preheat the oven to 325°F (160°C).
- In a bowl, combine graham cracker crumbs and melted butter. Press the mixture into the bottom of a springform pan.
- In a large mixing bowl, beat the cream cheese and sugar until smooth and creamy.
- Add the eggs, one at a time, mixing well after each addition. Then, mix in the vanilla extract and cooled espresso.
- Pour the cheesecake batter over the crust in the springform pan.
- Bake in the preheated oven for 50-60 minutes or until the center is set.
- Remove from oven and let cool before refrigerating for at least 4 hours or overnight.
Notes
- For a stronger coffee flavor, increase the amount of espresso.
- Serve with a dollop of whipped cream on top.
Nutrition
- Serving Size: 1 slice
- Calories: 400
- Sugar: 25g
- Sodium: 300mg
- Fat: 30g
- Saturated Fat: 18g
- Unsaturated Fat: 8g
- Trans Fat: 0g
- Carbohydrates: 35g
- Fiber: 1g
- Protein: 6g
- Cholesterol: 120mg


")