
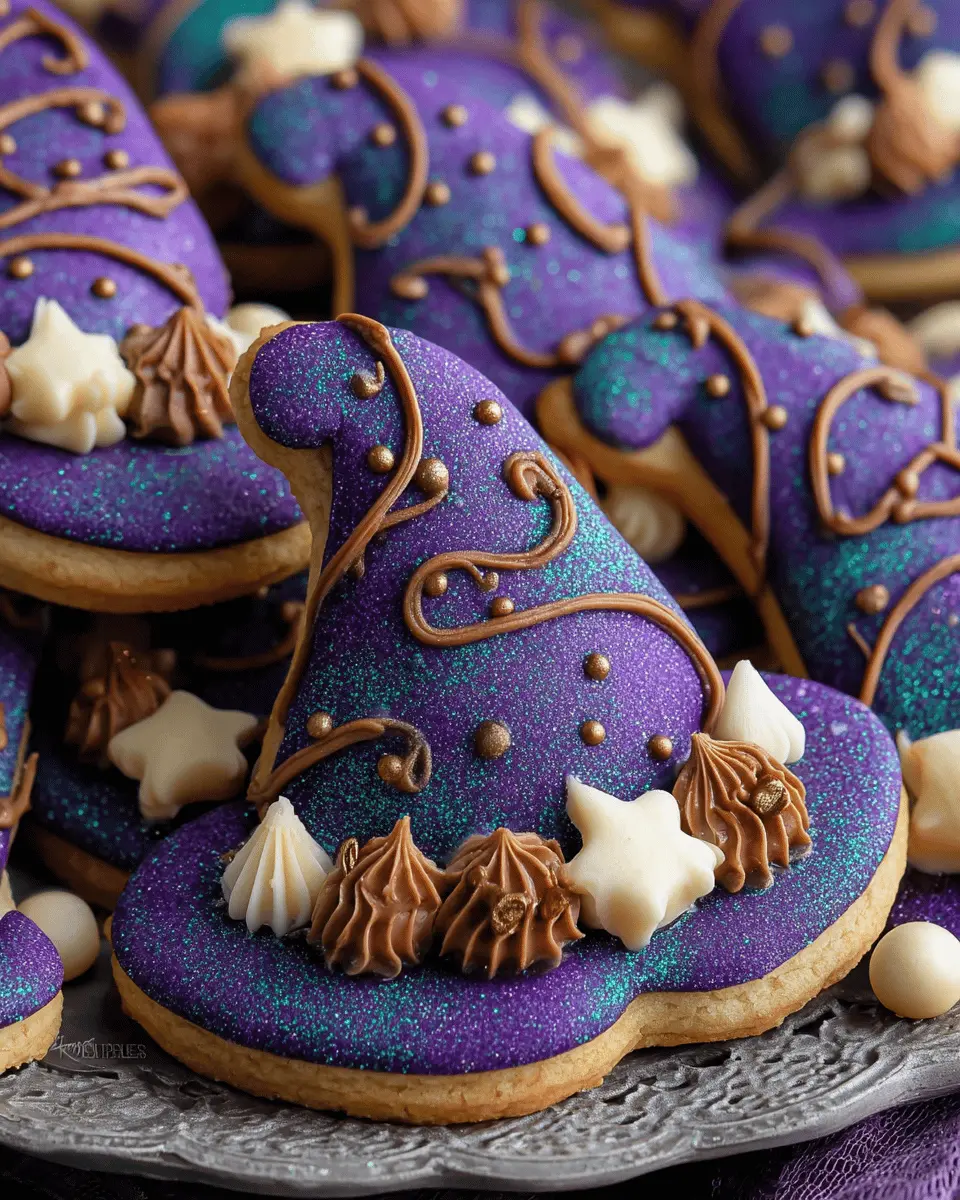
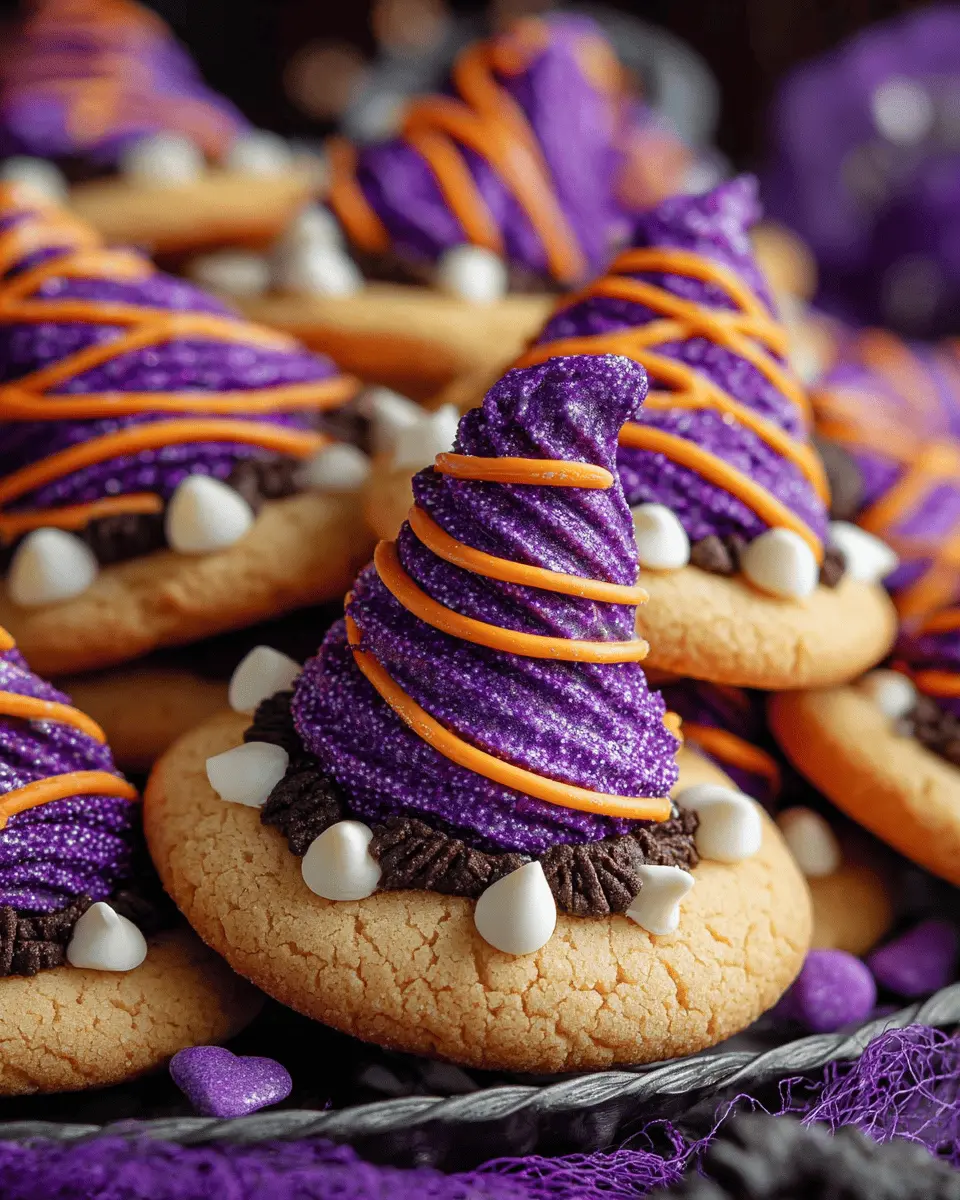
Introduction to Witch Hat Halloween Cookies
Halloween is the time of year when creativity knows no bounds, and what better way to celebrate than with delightful Witch Hat Halloween Cookies? These charming, festive treats not only look stunning on any Halloween spread, but they also capture the magic of the season in every bite. Imagine a gathering of friends or family, sharing laughs and stories, all while nibbling on adorable cookies shaped like witch hats—it’s a scene straight out of a Halloween dream!
Why Witch Hat Cookies are a Halloween Must-Try
First off, let’s talk about their appearance. Despite being simple to make, Witch Hat Halloween Cookies are visually striking. With their dark chocolate tops and colorful candy accents, they’ll stand out on your dessert table, making your event unforgettable. Plus, they are perfect for both kids and adults alike! And don’t forget to check out these 30 Creative Halloween Treat Ideas for more spooky inspiration.
If you’re wondering about the flavor, rest assured that these cookies are as delicious as they are fun. With a buttery, sweet base cookie paired with smooth chocolate and a touch of edible whimsy, they provide a wonderful balance that’s enchanting. Plus, these cookies can be customized easily. Want to throw in some turkey bacon bits for a salty contrast? Go for it! How about some sprinkles for a pop of color? Why not!
Moreover, the process of making these witch hats can be a wonderful bonding activity. Whether you’re gathering with friends for a baking night or making them with young family members, there’s something special about rolling out dough, decorating cookies, and, of course, indulging in the tasty results together. Not only do you share a delicious treat, but you also create lasting memories.
So, ready to conjure up some magic in your kitchen? These Witch Hat Halloween Cookies are sure to become a cherished recipe in your Halloween repertoire. Let’s dive into the details of how to create this spellbinding treat!

Ingredients for Witch Hat Halloween Cookies
Creating Witch Hat Halloween Cookies is a delightful way to embrace the spooky season! Let’s gather everything you’ll need to bake these whimsical treats.
Essential Ingredients for the Cookies
- Sugar Cookie Dough: You can either make it from scratch using flour, butter, sugar, and eggs or opt for refrigerated store-bought dough.
- Chocolate Kisses: These classic candies will serve as the “hats” of your witches—choose the original or dark chocolate for an extra-rich flavor.
- Sugar: A sprinkle of granulated sugar adds a lovely crunch and sweetness.
- Black Frosting: You can either use pre-made black icing or make your own by mixing black food coloring with good quality frosting.
- Candy Corn: These colorful candies are perfect for decorating the base of your witch hats and adding that pop of fall color.
Tips for Successful Baking
When it comes to mixing and matching ingredients, don’t be afraid to get creative! Feel free to explore different cookie bases, or if you’d like some extra fun, consider using flavors like pumpkin spice or chocolate cookie dough. For an extra touch of spookiness, look into decorating ideas from sources like Taste of Home for inspiration.
Now that you have the ingredients, are you ready to transform your kitchen into a witch’s lair? As you bake, imagine the festive atmosphere you’ll create while enjoying these enchanting cookies with friends!
Preparing Witch Hat Halloween Cookies
Getting eager for Halloween? These delightful Witch Hat Halloween Cookies are a fantastic treat that will enchant your friends and family. They are easy to make and perfect for any spooky gathering. Let’s get rolling with this recipe and create some bewitching delights!
Gather Your Ingredients
Before you dive in, let’s make sure you have everything you need right at your fingertips. Here’s a handy list to get you started:
-
For the Cookies:
-
2 cups all-purpose flour
-
1 teaspoon baking powder
-
1/2 teaspoon baking soda
-
1/4 teaspoon salt
-
1 cup unsalted butter, softened
-
1 1/4 cups granulated sugar
-
1 large egg
-
1 teaspoon vanilla extract
-
For Decoration:
-
Chocolate fudge frosting (store-bought or homemade)
-
Hershey’s Kisses (or any chocolate candy)
-
Candy corn or colored sprinkles (optional)
Make sure to check the pantry for these staples before inviting friends over. No one wants to be caught without enough flour for their Witch Hat Halloween Cookies!
Mix the Dry Ingredients
Once you’ve gathered all your ingredients, it’s time to handle the dry stuff. In a medium bowl, whisk together the flour, baking powder, baking soda, and salt. This simple step ensures that all those ingredients blend well together and prevents any lumps in your cookies.
If you’re interested in why mixing dry ingredients in advance is essential, experts say it helps maintain an even rise in baked goods. Who knew baking could be so scientific yet fun?
Cream Together Butter and Sugar
Next, grab a large mixing bowl and a hand mixer (or stand mixer). Cream the softened butter and sugar together until the mixture is light and fluffy. This step usually takes about 3-5 minutes, and you can immediately notice the transformation in texture. The Witch Hat Halloween Cookies will have that perfect chewy consistency you love!
Incorporate the Wet Ingredients
Now that your butter-sugar mixture is fluffy, it’s time to add in the wet stuff! Beat in the egg and vanilla extract until well combined. This is a great point to pause and inhale the sweet aroma wafting from the bowl; it’s simply irresistible!
Combine Wet and Dry Ingredients
Carefully fold your flour mixture into the butter-sugar blend. Use a spatula or wooden spoon to combine until just blended. Avoid overmixing! You want those cookies to have a tender bite, and overworking the dough can lead to a tougher cookie.
Shape the Cookies
Once your dough is ready, preheat your oven to 350°F (175°C) and line your baking sheets with parchment paper. Take small portions of the dough and roll them into balls, placing them about 2 inches apart on the baking sheet. Flatten each ball slightly, as they will expand while baking. Pro tip: If you want your cookies to have an extra Halloween touch, you might experiment with the shapes just a bit.
Bake the Cookies
Bake your cookies for about 10-12 minutes or until the edges are just golden. Keep an eye on them, as every oven behaves a little differently. Once you’ve taken them out, let them cool on the baking sheets for about 5 minutes before transferring them to a wire rack. This cooling process helps the cookies firm up for the Witch Hat Halloween Cookies final presentation.
With the right ingredients and a little fun creativity, you’re well on your way to impressing your friends with your Halloween baking skills. Once they’re cool, it’s time to add some icing, attach the kisses, and create those iconic witch hats!
Happy baking!

Variations on Witch Hat Halloween Cookies
Peanut Butter Alternatives
When it comes to Witch Hat Halloween Cookies, peanut butter often takes center stage, lending a creamy texture and rich flavor. However, if you or your guests have a peanut allergy or simply prefer something different, there are plenty of alternatives.
- Almond Butter: This offers a slightly sweeter flavor and works beautifully in cookie recipes. Just keep in mind that it may alter the texture a bit.
- Sunflower Seed Butter: Perfect for nut-free options, this substitute imparts a mild flavor and the same creamy consistency as peanut butter.
- Cashew Butter: Rich and silky, cashew butter can add a unique flair to your cookies without overpowering the other flavors.
Allergens and Dietary Considerations
Creating inclusive treats for Halloween gatherings can be a bit of a challenge, but fear not! Witch Hat Halloween Cookies can be adapted to cater to many dietary restrictions. For those watching gluten or dairy intake:
- Gluten-Free Flour: Brands like Bob’s Red Mill offer excellent gluten-free flour blends that work just as well as traditional all-purpose flour.
- Dairy-Free Options: Substitute regular chocolate with vegan chocolate chips or dark chocolate. Using coconut oil instead of butter can also help maintain that soft, chewy texture.
Remember, adding simple tags to your treats can make it easier for guests to identify potential allergens. Whether you’re catering to kids or adults, achieving that perfect balance between delicious and considerate ensures everyone enjoys the festivities. Plus, it shows thoughtfulness, which always strikes a chord, doesn’t it? For more on accommodating dietary preferences, check out resources from the American Academy of Allergy, Asthma & Immunology.
With a little creativity, everyone can indulge in Witch Hat Halloween Cookies this spooky season!
Cooking Tips and Notes for Witch Hat Halloween Cookies
Perfecting the Purple Swirl
Creating the perfect swirl in your Witch Hat Halloween Cookies is all about technique. Start by gently folding your purple and black icing together in a piping bag. The secret is to squeeze slowly and steadily, allowing the colors to blend just at the tip. Not only does this create a stunning visual effect, but it also adds a delightful flavor contrast. For extra style points, consider mixing in a little edible glitter to give those hats an enchanting sparkle!
Using Room Temperature Ingredients for Best Results
Another key tip for crafting your Witch Hat Halloween Cookies is using room temperature ingredients. Eggs and butter at room temperature help your cookie dough mix more evenly, resulting in a smoother texture and better rise. This small step can make a significant difference, ensuring your cookies are soft and chewy rather than dense. Aim to let your butter sit out for about 30 minutes before you start baking. Trust me; you’ll taste the difference!
For more helpful baking tips, consider checking resources like King Arthur Baking. Happy baking!
Serving suggestions for Witch Hat Halloween Cookies
Creative ways to showcase your cookies
When it comes to presenting your Witch Hat Halloween Cookies, creativity is key! Whether you’re hosting a spooky soirée or just treating your coworkers, consider these fun ideas:
- Decorated Platter: Arrange your cookies on a decorative platter adorned with cobwebs or mini pumpkins for an eye-catching display.
- Goodie Bags: Package each cookie in clear bags tied with orange ribbons. Perfect for party favors!
- Cookie Stand: Create a tiered cookie stand layered with colorful Halloween-themed napkins. This setup elevates the aesthetic and is sure to impress your guests.
Pairing suggestions with drinks
Completing your Halloween cookie experience means finding the right drinks to enjoy alongside your Witch Hat Halloween Cookies. Here are some delightful non-alcoholic options:
- Spiced Apple Cider: Warm or cold, this classic fall drink balances the sweetness of your cookies beautifully.
- Pumpkin Spice Latte: The comforting flavors of pumpkin spice complement the chocolatey goodness of your cookies, making it a perfect pairing.
- Herbal Tea: A refreshing peppermint or chai tea could bring a lovely contrast to the rich flavors of your cookies.
Feeling inspired? Check out this guide on Halloween DIY decorations for more ideas! The right setup and pairings can turn a simple treat into a highlight of your Halloween celebration.
Time Breakdown for Witch Hat Halloween Cookies
Creating these Witch Hat Halloween Cookies is a delightful way to celebrate the spooky season. Here’s a quick overview of how to manage your time for this fun baking adventure.
Preparation Time
First things first, gather your ingredients and supplies. You’ll need about 20 minutes to whip up the dough, shape the cookies, and prepare your chocolate, candies, and any embellishments. If you’re new to baking or just want to ease into it, take your time!
Cooking Time
Now, let’s talk cooking. Preheat the oven and bake your cookies for about 10 to 12 minutes. While they’re baking, you can clean up a bit—after all, a clean kitchen feels so much nicer, don’t you think? Use this time to get your witch hats ready for decoration!
Total Time
All in all, expect the entire process to take around 40 to 50 minutes from start to finish. Whether you’re entertaining guests or just looking to indulge your sweet tooth, these Witch Hat Halloween Cookies will be worth every minute! For some more mouthwatering ideas, check out the cookies on Taste of Home.
So gather your favorite treats, turn on a spooky playlist, and enjoy the process!
Nutritional facts for Witch Hat Halloween Cookies
When you’re whipping up a batch of Witch Hat Halloween Cookies, it’s great to know what you’re indulging in. Here’s a quick breakdown of their nutritional values:
Calories per cookie
Each cookie contains approximately 120 calories. This makes them a delightful treat without tipping the scales too much during the Halloween festivities.
Sugar content
You’ll find about 8 grams of sugar in each cookie, balancing sweetness and flavor with just enough richness to satisfy your sweet tooth.
Serving size information
A typical serving size is one cookie, perfect for sharing or saving for later. However, if you’re planning a Halloween gathering, it may be wise to prepare several batches!
Feel free to check out resources like Healthline for more insights on sugar consumption and nutritional guidelines. Balancing treats with healthier options makes Halloween not only fun but also a bit more guilt-free!
FAQs about Witch Hat Halloween Cookies
How can I store Witch Hat Cookies?
To keep your Witch Hat Halloween Cookies fresh and delicious, store them in an airtight container at room temperature. They can last for up to a week this way. If you prefer to freeze them, wrap each cookie individually in plastic wrap and place them in a freezer-safe bag. Just make sure to let them thaw completely at room temperature before enjoying them again!
Can I make these cookies ahead of time?
Absolutely! Witch Hat Halloween Cookies are perfect for prepping ahead of time. You can bake the cookies a day or two in advance and store them properly. If you’re looking to save even more time, consider preparing the cookie dough and refrigerating it for up to three days. This means less stress on the actual day you plan to serve them—just roll, bake, and decorate!
What if I can’t find certain ingredients?
No worries! Many baking recipes can be adapted based on the ingredients you have on hand. If you can’t find chocolate kisses for the toppers, consider using mini chocolate chips or even candy corn for a colorful twist. If a particular type of cookie is missing, check out this substitute guide from The Spruce Eats for other options that can work just as well. Remember, baking is all about creativity and making it your own!
Feel free to let your imagination guide you in this delightful baking adventure. After all, Halloween is all about fun and treating yourself!
Conclusion on Witch Hat Halloween Cookies
In conclusion, Witch Hat Halloween Cookies are the perfect treat to enchant your guests this spooky season. Not only are they visually delightful and whimsical, but they’re also surprisingly easy to make!
Imagine your friends’ faces lighting up when they see a platter filled with these charming cookies, made with just a few simple ingredients. Whether you’re hosting a Halloween party or just want to enjoy some festive baking, these cookies are sure to impress.
For more festive ideas, check out sites like The Spruce Eats for inspiration on Halloween-themed desserts or Food Network for exciting variations. Happy baking!
PrintWitch Hat Halloween Cookies: Easy and Fun Treats for Everyone

Delight your friends and family with these spooky yet delicious Witch Hat Halloween Cookies, perfect for any festive gathering!
- Prep Time: 30 minutes
- Cook Time: 12 minutes
- Total Time: 42 minutes
- Yield: 24 cookies
- Category: Dessert
- Method: Baking
- Cuisine: American
- Diet: Vegetarian
Ingredients
- 1 cup unsalted butter, softened
- 1 cup granulated sugar
- 1 large egg
- 1 teaspoon vanilla extract
- 2 cups all-purpose flour
- 1 teaspoon baking powder
- 1/2 teaspoon salt
- 1 cup chocolate fudge frosting
- 24 chocolate sugar cones
- 1 cup candy corn
Instructions
- Preheat the oven to 350°F (175°C).
- In a large mixing bowl, cream together the butter and sugar until light and fluffy.
- Add the egg and vanilla extract, and mix until combined.
- In a separate bowl, whisk together the flour, baking powder, and salt. Gradually add the dry ingredients to the wet mixture, mixing until a dough forms.
- Roll the dough into balls and place them on a baking sheet. Flatten them slightly.
- Bake for 10-12 minutes or until the edges are golden.
- Let the cookies cool completely.
- Once cooled, spread a generous amount of chocolate fudge frosting on each cookie.
- Top each cookie with a chocolate sugar cone, pointing side up, and add candy corn around the base for decoration.
Notes
- For a spooky twist, use different colored candy corns.
- These cookies can be made a day in advance.
Nutrition
- Serving Size: 1 cookie
- Calories: 150
- Sugar: 12g
- Sodium: 75mg
- Fat: 8g
- Saturated Fat: 5g
- Unsaturated Fat: 2g
- Trans Fat: 0g
- Carbohydrates: 18g
- Fiber: 1g
- Protein: 2g
- Cholesterol: 30mg


")